Set up a simple form
Before you start
|
Why do I need to set up all these different parts of a template?
|
Overview of process
|
|
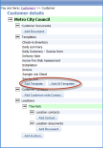
Step 1. Create a new template
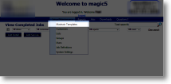
- In the Setup/Maintenance menu, select 'Maintain Templates'.
-
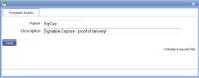
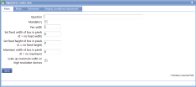
Click the 'Add Template' button at the bottom of the list of templates. This brings up the following screen where you need to enter an identifying name and a description that will mean something to your administration and device users and anyone viewing the report.
- Click the Save button which will create the empty template and add it to the list.
Step 2. Add a document, a page and a section
-
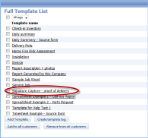
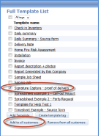
Click on your new template in the Full Template List.
-
Click on the Add Document button.
-
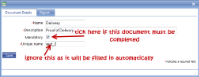
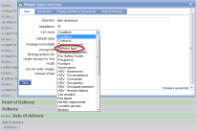
Enter a name and description (you may find yourself duplicating descriptions). Tick the 'Mandatory' box if this document must be completed (for proof of delivery this is probably true) and ignore the 'Unique name' prompt. You can also ignore the 'Report' tab. For more details on creating documents, go to the Document help page. Save.
-
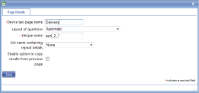
Click on the Add Page button and enter the page name. This is the name that will appear in the tab at the top of the device to aid the user to fill in details. For more details on creating pages, go to the Page help page. Save.
-
Click on the Add Section to Page button and enter the section description. This name may or may not appear (depending on detailed settings) on the page on the device to break up items for the device user. For more details on creating sections, go to the Section help page. Save.
Step 3. Add data item types to your section
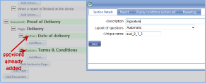
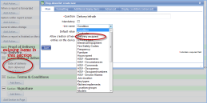
- Click on the Add Item ... button and select your data item type from the large list that appears (more detail available at the Item Types help page). This example will use a date, a multiple-choice and a drop-down list in this section.
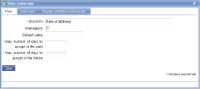
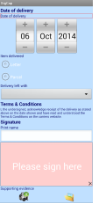
- Click on the Date button on the Add Item list and enter the text that will tell the device user what date to enter here. For more details on Date item types go to the help page. Save.
- Click on the Multiple-choice button on the Add Item list and enter the text that will tell the device user what they are choosing for and select the correct list name from the drop-down list titled 'List name'. The list 'Delivery type' has already been set up to contain items 'parcel' and 'letter' - see List help pages for more information. For more details on Multiple-choice item types go to the help page. Save.
- Click on the Drop-down list button on the Add Item list and enter the text that will tell the device user what they are choosing for and select the correct list name from the drop-down list titled 'List name'. The list 'Delivery recipient' has already been set up to contain various possible recipients - see List help pages for more information. For more details on Drop-down list item types and allowing list items to be added while the form is being filled in go to the help page. Save.
Step 4. Add text item types to your section
- Click on the Fixed text button on the Add Item list and enter the text that you wish to display. For more details on Fixed text item types go to the help page. Save.
Step 5. Add signature capture to a section
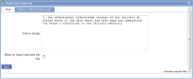
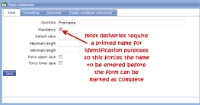
- Click on the Text button on the Add Item list and enter the wording that will guide the device user to enter the data you need. In this case, it has been made a mandatory item so that the form cannot be regarded as complete until this data item has been entered. For more details on Text item types go to the help page. Save.
- Click on the Signature button on the Add Item list. There are no fields that must be filled in here but details on how Signature item types can be tailored to your needs go to the help page. Save.
Step 6. Add photo capture to a section
- Click on the Photo button on the Add Item list and enter the wording that will guide the device user to enter the data you need. It is always useful to have a photo capture function on a template as supporting evidence - even a proof of delivery form might benefit from a photograph of where/how the item has been left on the premises. For more details on Photo item types go to the help page. Save.
Step 7. Add an automatic action
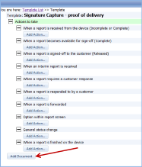
- Look at the template that you have created and see how it has taken shape. At present it will collect the data required and a report will be sent back to the administrator's website when uploaded from the device (see below). However it is also possible to send a copy of the report to a customer, or even just an email notification to the administrator to alert them to look at the uploaded report.

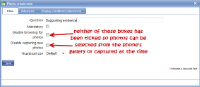
- Click on the Add Action ... button underneath the part of the template's lifecycle that should trigger the action. In this case, we are using 'When a report is received from the device (Incomplete or Complete)' which is triggered when the form is manually or automatically uploaded from the device. Select 'E-mail notification (no attachments)' from the list and fill in a description and an e-mail address from which the e-mail is to be sent. For more details on Template Actions go to the help page. Save.
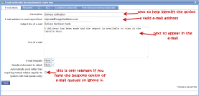
- Click on the Recipients tab and fill in the e-mail address of the recipient. More complicated options are available - for more help go to the help page. Save.
Step 8. Associate this template with the relevant customers
- If you wish to associate this template with all customers then tick the box next to the required template in the Full Template List (Setup/Maintenance menu and Maintain Templates if you are not already there). Then click on the Add to all customers button which will add just the indicated template to all customers. To find out more about Customers visit the help pages.
- If you only wish to add the template to a specific customer, select Customer from the Setup/Mainentance menu and select the customer from the list that appears there. Click on the Add Template button (or the Add All Templates which will include the one you have just made) and select the template name from the drop down list
- To find out more about attachments for customers go to the help pages.
Step 9. Save and transfer the template to your device
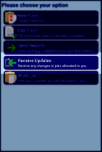
- Open magic5 on your device and the new data should be downloaded automatically.
- If magic5 is already open or the new template does not appear, select Receive updates from the menu.
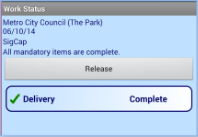
- Select New Form from the Device menu and select customer, location and the name of the template you have just created. You will then see an empty form with all the items added above.
- On completion, save using your device menu or use the 'back' button to return to the previous screen and you will be asked whether to save or cancel. If you save, you will be given the opportunity to release the report and it will be sent back to the server for viewing on the administrator's website. Click the Release button and, if necessary, return to the Device menu and select Send Reports to explicitly send the data to the server.
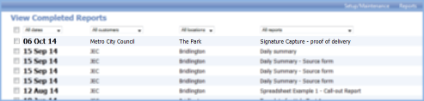
- On the administrator's website, select Completed Reports from the Reports menu and you should see your completed form (now referred to as a report) in the list.
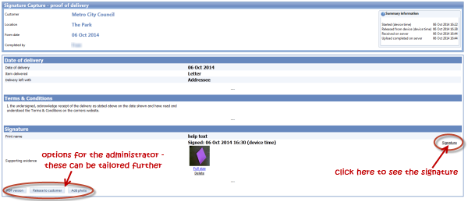
- Click on the completed report to view the data that has been collected on the device.
See Also